Synchronizing Prescribers Using PrescribeIT® Registry Compare
You can update existing Doctor Folders in PharmaClik Rx by using the PrescribeIT® Registry Compare feature.
An unsynchronized doctor can be identified in two ways:
-
In bold on the To Do tab of the PrescribeIT® Message Manager.
-
A red box around the expander icon in the New Rx window.
To synchronize existing doctor folder records with the prescriber information from the PrescribeIT® Registry:
- Search for and select a doctor by doing one of the following:
- Select the Doctor button; or
- When processing a new order from the New Prescription window, select the expand icon
 next to the Doctor field.
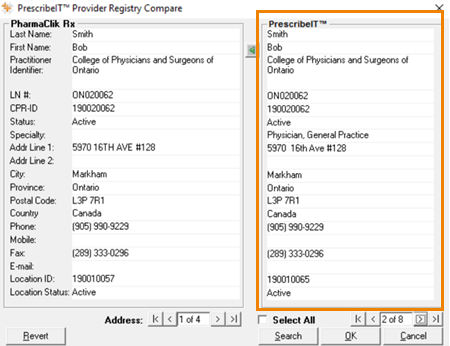
- In the doctor folder's main tab, select the Compare button. The PrescribeIT® Registry Compare window opens. To learn more about this window, see PrescribeIT® Registry Compare Overview.
- To initiate the search in the Provider Registry, select the Search button. The PrescribeIT® Provider Registry Search window opens and existing criteria will be populated based on PharmaClik Rx local doctor record.
- Select the Search button. The search results will populate in the lower half of the PrescribeIT® Provider Registry window.
- Select the corresponding prescriber (with the corresponding address) and select OK. Details for the selected prescriber will populate under the PrescribeIT® section (on the right) of the PrescribeIT® Provider Registry Compare window.
- Ensure the name and address information is correct.
- Update the PharmaClik Rx section with information from the PrescribeIT® section by doing one of the following:
- Copy all the PrescribeIT® information into the local record, select the Select All checkbox and then select the green arrow button
 .
. - Individually select the rows you want to copy over from the PrescribeIT® section, and then select the arrow button .
- Copy all the PrescribeIT® information into the local record, select the Select All checkbox and then select the green arrow button
- Optional: To synchronize more than one location for the prescriber, select the navigational arrows under the PrescribeIT® section (maximum of four locations can be synced to one local record) and repeat Step 7.
- Select OK to update your changes to the local record.
Note: You can edit the search criteria as required. For more information on searching for a doctor in the Provider Registry, see Searching for a Doctor in the PrescribeIT® Registry.
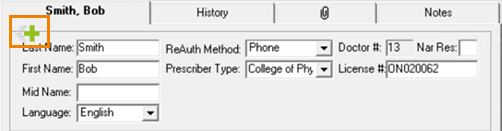
Result: When a prescriber has been synchronized, the green PrescribeIT® icon will appear at the top left of the record.
Note: The Compare button at the bottom of the screen can be used to add up to three more locations for this prescriber. To learn more, see Adding More Than Four Locations for a Prescriber.